Wednesday, January 25, 2012
This procedure
demonstrates how to install Windows XP Professional. The most widely used Windows version is Windows
XP. Most of us are used to windows XP so windows Vista and Windows 7 look quite
a lot more complex, that’s why we stick with XP. Although their appearance is
nice, especially their animated desktop background in ultimate version. So, the
choice is yours and lets go in the Windows XP installation process.
But hey! There are lots of
things to bear in mind before you do the installation process specially if you
are doing the reformatting. Backup your important data before you begin this process! (If you have multiple partitions on your hard drive, data on partitions other than the system partition “except C drive” will not be affected with the following steps, but a backup is still recommended to be on the safe side). You will also have to re install all the software's you were using in your previous XP.
- THE CONSENT OF COMPUTER OWNER
- WINDOWS CD INSTALLER
- OPTICAL DRIVE
- Before you perform the installation I recommend that you check Windows XP Compatibility List to ensure that your hardware is supported by Windows XP.
To inter the BIOS setup you need to press keys, either F1,F2,F10,F12,F11 and commonly DEL or delete depending on the motherboard BIOS instruction after the POST (Power On Self Test').

After you enter the BIOS Setup Screen,
look for BOOT that’s
where you change your Boot Priorities. Every Motherboard has it’s own boot software so
your might not look like mine. To change the order of CD-ROM, try use your arrow KEYS on
your keyboard and Enter key to select the CD/DVD-ROM
Drive as first boot.Some by hitting on + or - on your keyboard. Some of
motherboards use F4 or F5,F5 or F6.

Before starting your Windows XP Installtion, we
need to tell BIOS that the settings changed need to be saved. Find Exit on
your screen than use arrowbuttons on your keyboard to go there. And on Exit
Saving Changes click Enter. There is a Shortcut to
do this wherever you are on te setup. Just press the F10 button on
your keyboard and a windows will popup asking you , are you sure you want to save
configuration changes and exit.Before hitting enter, insert first your WINDOWS XP CD INSTALLER on your optical drive then You hit enter on yes. Now you are ready to
start your Windows XP Installation. Enter your Windows XP CD
and start your computer.

Notice: If you don’t have any Xp installation in
your Hard Drive or if your hard drive is fresh new you will not get the Press
any key to boot from CD screen. After you press any of the
keyboard keys you screen says Setup is inspecting your computer’s
hardware configuration.

Depending on your computer configuration and how fast your
computer is … this screen will load files drivers for your
computer and it may take 2 minutes or more. Just wait for it to load them.

After it is done the screen says Setup is starting
Windows. After that you see the Welcome to Setup screen.
There are 3 options that you can continue with. 1rst by Pressing ENTER to
start Windows XP setup. 2nd is by pressing R to start
repairing Windows XP and the 3rd is to press F3 to exit
Windows Setup. As we want to setup a new Windows Installation we go with the
1rst option. Press Enter on your keyboard.

The next thing you will need to do is Press F8 so
windows XP will know that you have read and you are accepting the License
Agreement. If you want to read the entire agreement, use the Page Up and Page Down of your keyboard.

After
you press F8 and agree you get the screen where your partitionsshow. Partitions
are parts of your Hard Drive. You can have as many as you like, I prefer
having 2 drives (Drive C & Drive D). One for Windows OS and the other for stuff I would like to keep safe.
If your windows somehow doesn’t work or crashes you will need to format your C
drive to get things work again .. or you can repair your Windows, but maybe you
would like to start fresh again so I recommend keeping your Documents,
pictures, music, anything on your D drive, the second drive. You create a
partition by pressing the C button on your keyboard. After pressing C, you get
the screen where you will need to specify how much your partition size will be.
The size is calculated in MB(MegaBytes). So for 40GB(GigaBytes) of
partition you will need 40960 MB. The easy way of partitioning for me is calculate it by percent. So in this 40960 if you want 40% to your drive C, and 60 percent for your drive D.(40960*.40) = so the capacity of drive C=16384 and the rest is for your drive D. But possible in the partitioning there are 8MB deducted on that given space. That is the default, called as system reserve.
Notice: As you may or may not know 1GB = 1024 MB. That is why 40 GB is equal to 40960 MB.
After you write your desired size hit Enter and the partition
will be created. As I mentioned above you can create as many partitions you
like. For doing that just hit C every time you want to create a partition.

After you have created your partition(s) select the desired
partition and pressEnter to continue with the setup. You will get
to the Next screen asked with what kind of type you want your
partition formatted. You can select any but NTFS (New
Technology File System) works faster than FAT32 (File Allocation Table).
You have 2 options Quick format and Normal format. Quick
format is just as it sounds, it is quick. Use it when you don’t have a lot
of time. But I recommend the Normal Format. Then Windows Setup needs to confirm
for formatting your partition. To do that you need to press F.

So
now Windows Setup will Format your drive and Copy all the installation files
into your hard drive to continue with the Setup. All you need to do is wait for
the formatting and copying to finish. Grab a cup of coffee, light a cigarette
or do something else. Depending on your computer speed the time of
waiting may vary from 3 to 15 minutes

This
is the last screen you will see on the Text-based Setup of Windows XP. Just
Press Enter or wait 15 second for your computer to reboot.
After rebooting you will get Press Any key to continue screen this time you
dont need to Press any key to boot from CD … just
wait for it to timeout and your Windows Setup will continue

The picture on the left shows the first Graphic screen with
mouse of the Windows XP setup. And the picture on the right shows Installing devices.
Your Screen may flicker while Windows is Installing Devices. It
flickers because Windows XP Setup is installing your Graphic card. So
be Patient and Wait. Relax and grab your snack!

This is the first window in your Windows Xp Setup. There are
2 things to be considered in this step. You can Customize your Regional
And Language Options and Text Services and Input Languages or
leave them as they are so you will customize them later when you finish installing Windows
XP.
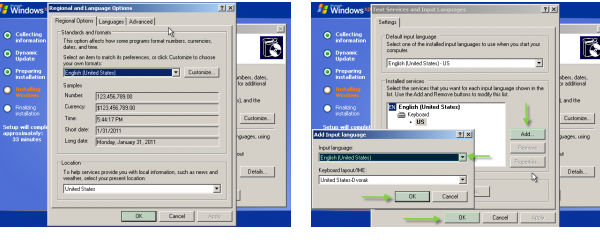
So If you want to customize any of these settings go ahead, like choose your language and choose your location(Region) so the computer will show currencies, time short date long date like it is shown in your region. Also you can add languages, input languages support for your keyboard to type in any language you want. As I said you can do these after the setup finishes but why not set them now so you will not waste time after installation for these things, but waste time installing the drivers instead.

Type your name and organization. Please don't write your nickname here, except if you are the owner. Recognize the owner by asking him what is the best suited name.

Enter
your product key. 25 characters. Usually found in the CD case if genuine. If not , I used product key for so long that suited to Any Windows XP :
K2KB2-BDBGV-KP686-D8T7X-HDMQ8

Name
the computer, and enter an Administrator password if necessary or you were told to do so. Don't forget to chat down your Administrator password in case of memory gap!

The next screen is for the Time and Date Settings. Check the timezone. If you don’t know what timezone you are in, go to The World Clock and in theSearch for City field write your city and it will show the timezone of your city. It’s pretty easy. Click Next.

The next thing you need to do is to choose the Network Settings for your computer. Usually everyone chooses Typical settings and click next.

Next thing write your workgroup name or domain name if your computer is part of any of those. If not just leave the default and click Next.
Now you wait. Have a BREAK, have a SKY FLAKES!

After all these processes have
finished as shown in the pictures above, you will get a screen with a pop-up
windows saying To improve the appearance of your visual elements,
Windows will automatically adjust your screen resolution. Click on OK.

The Screen you get next is Microsoft Windows XP Please wait…
screen. As it says, Please wait … just wait a few seconds or minutes depending
on your computer speed.

Finally Windows will start and present you with a Welcome screen. Click next to continue.

Will
this computer connect to the internet directly, or through a network? If you
are connected to a router or LAN then choose: 'Yes, this computer will connect
through a local area network or home network'. If you have dial up
modem choose: 'No, this computer will connect
directly to the internet'. Then
click Next.

Ready
to activate Windows? Choose yes if you wish to active Windows over the internet
now. Choose no if you want to activate Windows at a later stage.Again if pirated OS, no need to activate or else you lose your effort.

Next you will be asked for a username for your computer and if you written any password for the administrator account,Just enter the password and hit Enter on your keyboard. If none just hit and click the arrow key. Your computer will apply your personal settings of your user and log on to your username.

OH YES! THIS IS THE FINAL STAGE AND AS YOU NOTICED THERE IS NO ICON ON THE DESKTOP . SO NOW HERE, RIGHT CLICK MY DOCUMENTS AND CLICK SHOW ON DESKTOP. THE SAME PROCEDURE ON MY COMPUTER.

Note:
If you have used any cracked version of windows or any unattended Windows Setup, most of the steps mentioned above are skipped and default values are added.
After The Installation
Install the missing drivers because windows XP will install a limited set of drivers,you’ll have to find the rest. To see which drivers you’re missing, go to the Control Panel > System > Hardware tab > Device Manager or right click My Computer>properties>hardware>device manager. If there are things next to a Yellow exclamation is a missing driver. You’ll need to reinstall these drivers from a system CD that came with your computer or download them from the manufacture’s website.
- IF YOU HAVE THE DEVICE DRIVER INSERT IT IN YOUR OPTICAL DRIVE AND FOLLOW THE CORRESPONDING PROCEDURES.
- To install a driver manually use the following procedure:
(a) From the device manager double click on the device containing the exclamation mark.
(b) This would open a device properties window.
(c) Click on the Driver tab.
(d) Click Update Driver button. The Wizard for updating device driver pops up as shown below:
You now get two options. The first option provides an automatic search for the required driver. The second option allows you to specify the location of the driver. If you don't know the location of the driver choose the automatic search which would find the required driver from the manufacturer supplied CD or Floppy disk. Windows would install the required driver and may ask you to restart the system for the changes to take affect. Use this procedure to install drivers for all the devices that contain an exclamation mark. Windows is completely setup when there are no more exclamation marks in the device manager.
...SO THAT'S ALL ABOUT OF OPERATING SYSTEM... NEXT IS YOUR APPLICATION SOFTWARE.
time check 12:10 A.M.
i really sleepy and exhausted , pero ok lang at least my pinaghirapan.
Subscribe to:
Post Comments (Atom)
0 comments:
Post a Comment
Note: Only a member of this blog may post a comment.